The article describes in great detail with a photo accompaniment the process of repairing a starter on a VAZ 2110 car. The article describes in great detail with a photo accompaniment the process of repairing a starter on a VAZ 2110 car.

In a new car, breakdowns and malfunctions in the starter are rare. The car owner himself can determine the malfunction of the starter - the car does not start, uncharacteristic sounds when starting the engine, the starter turns off spontaneously.
But many motorists do not pay attention to such signals from the car. And they bring the situation to the point that it is already impossible to "save" the starter. But an experienced motorist who monitors his car, immediately, by the sound of a working car, will determine the malfunction of this part. So how do you fix a starter? Its repair takes place in several dozen stages described below.
Starter repair procedure:

1. First, you need to remove the starter from the car. Now we proceed to disassemble the part.
2. Unscrew the nut.
3. Disconnect the tire from the traction relay contact bolt.

4. Carefully remove the two bolts that hold the traction relay.
5. The traction relay must be removed from the starter.

6. Set aside the starter itself and remove the armature from the traction relay. To do this, lift it up and the anchor loop is released from the lever.
7. Now we return to the starter itself. Remove the tie rod nuts.

8. The next step is to remove the cover from the drive end with the gearbox and the same assembly part.
9. The cover must also be removed from the side of the collector with brushes and brush holders.

10. Then remove the gear from the anchor shaft.
11. Pull the anchor itself out of the starter.

12. The anchor shaft has a washer on the drive end (pay special attention to this).
13. Use a screwdriver or other thin object to remove the anchor shaft support.

14. Then use a small screwdriver to remove the two tie rods from the starter cover. In general, it is not necessary to remove them, if you are in a hurry, you can leave them, however, it is more convenient to remove the drive and gearbox without these pins.
15. Then remove the three gears of the reducer. A breakdown of the starter may consist precisely in the fact that these gears have damaged, broken teeth or needle bearings embedded in the gears. If this defect is present, then replace the parts and the starter will work again.

16. But, if the gears are in order, then continue to disassemble and check the starter for damage further. It is necessary to remove the gearbox with the drive from the cover, after pressing on the gear wheel of the starter drive.
17. The support with the seal must be removed from the lever.

18. Then pull the support out of the seal. Review the support. The plastic part must not be damaged or badly worn. If you see that the support is deformed or the rubber gasket has hardened, replace them. 19. Use a hammer to knock the stop ring off the retaining ring using a suitable mandrel.

20. Carefully remove the retaining ring first and then the stop ring.
21. Remove the actuator assembly from the drive shaft.

22. Unscrew the lever retaining ring.
23. Then remove the lever with washer and leash.

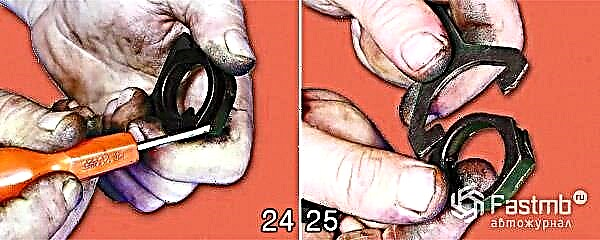
24. Use a screwdriver to unscrew the spring of the lever.
25. Now you can remove the lever from the liner, and separate the halves of the lever.

26. Remove the meshing gear retaining ring.
27. Next, disassemble the internal gear and remove the drive shaft support from the shaft.

28. Carefully remove the o-ring from the pore. Examine it carefully. A damaged, deformed, hardened ring is detrimental to the operation of the entire starter. It must be replaced.
29. The next step is to remove the insert from the support.

30. From the side of the collector, unscrew the two screws and remove the brush holder.
31. Using a screwdriver, pry off the brush clips.

32. Then remove these clips and their hold-down springs. Again, replace deformed or damaged parts, heavily compressed or bent, broken springs.
33. Pull the brushes out of the brush holder guides.

34. Uninsulated brushes must be removed.
35. Then remove the cardboard insulation strip. If it is damaged, compressed, torn, replace it with a new one.

36. Remove the insulated brushes with connecting rails.
37. Carefully and in detail inspect the anchor. Pay attention to the collector.
- 1. If the part is dirty, smoked, sand it with glass fine sandpaper. If traces of significant roughness are visible on it or mica protrudes strongly, grind the part on a lathe and then grind the collector with fine sandpaper.
- 2. If traces of yellow plaque from the bearing are visible on the anchor, then clean it with fine glass cloth, because later this can lead to seizure of the shaft gear. If there are dents or nicks on the surfaces of parts such as pins and shaft splines, replace the entire armature. Pay attention to the winding along the ends of the armature. If you see any flaws there, replace the anchor.
- 3. Check the reliability of soldering the leads of the armature winding to the collector plates.

38. Using a test lamp supplied with an alternating current of 220 V, check the condition of the armature winding. Apply the lamp voltage to the collector plate and the armature core. If everything is in order, the lamp should not be lit. If, nevertheless, it burns, then the anchor winding has closed. In this case, simply replace the starter armature with a new one.
39. While holding the overrunning clutch, turn the starter gear in both directions: clockwise the gear should move absolutely freely, and should not rotate counterclockwise at all. If something is broken, replace the drive.

40. Then put the starter drive onto the drive shaft. If everything is in order, then it should move freely, without jamming or stopping, along the splines of the shaft.
41. If you see that the drive parts are badly worn, deformed, damaged, replace the drive. If you find nicks on the winding end of the gear teeth, grind them with a fine-grained emery wheel. Choose a circle with a small diameter.
42. Inspect the bushings in which the shafts rotate. They are installed in the starter cover on the drive side, on the manifold side, the armature shaft and the drive shaft support. If bushings are deformed or scored, replace covers or supports with broken bushings. Cracked covers and supports should also be replaced.
43. Carefully inspect the starter itself, and if there are traces of anchor rubbing on it, replace the cover and intermediate support with a new one.
44. Worn brushes up to the size between the working surface and the terminal less than 3.5 mm, replace.
45. The brushes must move freely towards the brush holder. And the brush holder should not have cracks, chips, flaws. Check if this is so. If everything is in order, then proceed to the next stage of the repair. If there are faults, replace the parts.

46. Begin inspection of the drive shaft. Its elements should not show signs of damage, severe wear and deformation. If there is plaque, remove it with fine glass sandpaper. Work carefully so as not to damage the parts.
47. Using an ohmmeter, check if the contact plate closes the traction relay contact bolts. If they do not close, replace the parts or simply repair the relay.

48. To repair the relay:
- 1. Remove the two screws.
- 2. Unsolder the relay coils and terminals.
- 3. Then remove the cover, and sand the pins and bolt heads with sandpaper. The relay should be assembled in the reverse order.
49. Now proceed with the assembly of the starter. Before starting, lubricate the gear teeth with engine oil. Assemble the starter in reverse order.
50. Install the brush holder in the starter separately from the cover on the collector side.To assemble and install this part, use a bushing with a diameter (mark 1) equal to the diameter of the manifold (approximately 30 millimeters).
51. Install the assembled brush holder into the starter housing until it stops, then remove the bushing and install the cover on the starter from the collector side. The renovation is completed.
And your starter for a VAZ car is as good as new again!WHA